

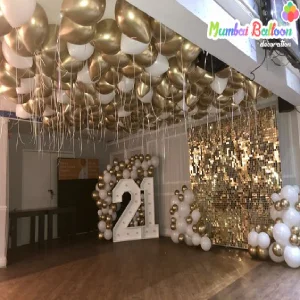
A balloon wall is a vibrant, eye-catching backdrop that can transform any event, from birthdays and weddings to corporate gatherings and baby showers. Perfect for photo booths or as a statement piece, a balloon wall is easier to create than you might think. In this step-by-step guide to making a stunning balloon wall, we’ll show you how to craft a professional-looking decoration, even if you’re a beginner. Let’s dive in!
What You’ll Need to Create a Balloon Wall
Before starting, gather these essential materials:
- Latex Balloons: Various sizes (5”, 11”, and 16”) and colors to match your event theme.
- Balloon Pump: A hand or electric pump to speed up inflation.
- Balloon Wall Frame or Net: A mesh net, chicken wire, or a pre-made frame for structure.
- Fishing Line or String: To secure balloons or the frame.
- Command Hooks or Adhesive Strips: For wall mounting.
- Scissors: For cutting string or trimming materials.
- Optional Decorations: Greenery, flowers, LED lights, or signage for added flair.
Step 1: Plan Your Balloon Wall Design
Start by determining the size and style of your balloon wall. Measure the space where the wall will be placed common sizes are 6×6 feet or 8×8 feet for photo backdrops. Choose a color scheme (e.g., pastels, metallics, or bold hues) that complements your event. Sketch the design, noting where larger or smaller balloons will go for a dynamic look.
Pro Tip: Mix balloon sizes and add metallic or confetti-filled balloons for a luxurious effect.
Step 2: Prepare the Balloon Wall Frame
A sturdy frame is key to a professional balloon wall. You can use:
- Chicken Wire or Mesh Net: Lightweight and flexible, perfect for attaching balloons.
- PVC Pipe Frame: Build a freestanding frame for larger walls.
- Pre-Made Balloon Wall Kit: Includes a frame or net for easy setup.
Secure the frame to a wall using command hooks or set it up as a freestanding structure with weighted bases. Ensure it’s stable before adding balloons.
Step 3: Inflate the Balloons
Use your balloon pump to inflate balloons to varying sizes for depth and texture. Tie each balloon securely. Aim for 100-200 balloons, depending on the wall’s size. For consistency, use a balloon sizer to keep balloons uniform (e.g., 11” for the base layer, 5” for accents).
SEO Tip: Consistent balloon sizes create a polished look, making your wall Instagram-worthy and appealing to event planners.
Step 4: Attach Balloons to the Frame
Start attaching balloons to the frame or net:
- Push the knotted end of each balloon through the holes in the mesh or net.
- Alternate colors and sizes to create a cohesive pattern.
- Cluster balloons tightly to avoid gaps and achieve a full, lush look.
For a more organic style, tie balloons in groups of 2-3 before attaching them to the frame.
Step 5: Fill Gaps and Add Depth
Step back and check for any gaps in the balloon wall. Add smaller balloons (5” or 7”) to fill sparse areas. For extra dimension, attach a few balloons with double-sided tape or glue dots directly onto others, creating a layered effect.
Pro Tip: Use a mix of matte and shiny balloons to add texture and visual interest.
Step 6: Add Decorative Elements
Elevate your balloon wall with embellishments like:
- Greenery: Weave in faux vines or eucalyptus for a natural touch.
- Flowers: Attach fresh or artificial flowers with floral wire.
- Lights: Add LED string lights for a magical glow.
- Signage: Include a custom sign (e.g., “Happy Birthday” or “Congratulations”) for personalization.
SEO Tip: Unique elements like themed signage can make your balloon wall stand out in searches for creative event decor.
Step 7: Secure and Display the Balloon Wall
Ensure the wall is securely mounted or freestanding. For wall-mounted setups, use command hooks or adhesive strips rated for the frame’s weight. For freestanding walls, anchor the base with heavy weights. Double-check stability to prevent the wall from tipping over.
Tips for a Durable Balloon Wall
- Choose Quality Balloons: High-grade latex balloons last longer and resist popping.
- Avoid Heat Exposure: Keep the wall away from direct sunlight to prevent deflation.
- Use Balloon Shine Spray: This keeps balloons looking vibrant for days.
- Assemble in Advance: Build the wall a day before the event to save time.
Common Mistakes to Avoid
- Using Low-Quality Balloons: Cheap balloons pop easily and fade quickly.
- Overcrowding the Frame: Too many balloons can strain the structure.
Skipping the Frame: A proper frame ensures a stable, professional look.

Pingback: xenical alli price
Pingback: tadalafil cost goodrx
Pingback: vardenafil 20mg tablet
Pingback: rogaine minoxidil eyebrows
Pingback: proscar 1 mg prezzo
Pingback: cialis prescription name
Pingback: kirkland minoxidil review
Pingback: toradol pain mechanism
Pingback: toradol duration comparison
Pingback: sildenafil online protection
Pingback: vardenafil 10 mg dose overview
Pingback: safe online ordering
Pingback: orlistat side effect warnings
Pingback: Sildenafil vs Avanafil Analysis Hub
Pingback: Sildenafil vs Cialis Onset Timing Guide
Pingback: guide to sildenafil