

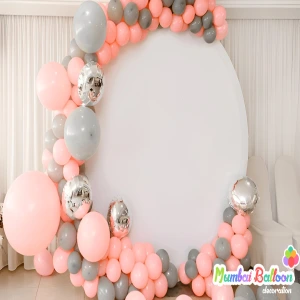
Balloon arches are a stunning and versatile decoration for events like weddings, birthdays, baby showers, or corporate gatherings. They add a festive touch and create a perfect backdrop for photos. In this step-by-step guide to making a balloon arch, we’ll walk you through the process of creating a professional-looking balloon arch at home, even if you’re a beginner. Let’s get started!
What You’ll Need to Make a Balloon Arch
Before diving into the steps, gather the following materials:
- Balloons: Latex balloons in various sizes (5”, 11”, and 16”) and colors to match your theme.
- Balloon Pump: A hand or electric pump to save time and effort.
- Balloon Arch Kit: Includes a flexible strip or frame for shaping the arch.
- Fishing Line or String: For securing and hanging the arch.
- Command Hooks or Weights: To anchor the arch to walls, tables, or the ground.
- Scissors: For cutting string or trimming the balloon strip.
- Optional Decorations: Greenery, flowers, or ribbons to enhance the design.
Step 1: Plan Your Balloon Arch Design
Decide on the size, shape, and color scheme of your balloon arch. Consider the event theme and venue space. A standard arch is about 10-20 feet long, but you can adjust based on your needs. Sketch a rough design to visualize the placement of colors and balloon sizes. For a fuller look, mix different balloon sizes and create a color palette with 2-4 complementary shades.
Pro Tip: Use a balloon sizer (a cardboard template) to ensure consistent balloon sizes for a polished look.
Step 2: Inflate the Balloons
Using your balloon pump, inflate balloons to various sizes as per your design. Tie each balloon securely. For a professional appearance, inflate balloons to consistent sizes (e.g., 11” for the main body, 5” for filler balloons). Aim for 50-100 balloons, depending on the arch’s size.
SEO Tip: When inflating, ensure balloons are not overfilled to avoid popping, which can disrupt your workflow.
Step 3: Attach Balloons to the Arch Strip
Most balloon arch kits come with a flexible plastic strip with holes for securing balloons. To attach balloons:
- Pull the knotted end of a balloon through a hole in the strip.
- Alternate colors and sizes to create a balanced look.
- Cluster balloons tightly together to avoid gaps.
For a more organic look, attach balloons in groups of 3-4 (called quads) by tying their knots together before securing them to the strip.
Step 4: Shape the Balloon Arch
Once all balloons are attached, gently bend the strip to form the arch shape. Secure one end to a weight (like a sandbag or water-filled base) or a command hook on a wall. Adjust the balloons to ensure they’re evenly spaced. If you’re using a frame, follow the kit’s instructions to assemble it before attaching balloons.
Pro Tip: For outdoor arches, use heavy weights to secure the base against wind.
Step 5: Secure and Install the Balloon Arch
Position the arch in your desired location. If it’s a freestanding arch, attach both ends to weights. For wall-mounted arches, use command hooks or fishing line to hang it securely. Step back to check for gaps or uneven sections, and adjust balloons as needed.
Step 6: Add Finishing Touches
Enhance your balloon arch with greenery, flowers, or ribbons to match your event’s theme. You can weave in artificial vines or attach small floral accents with hot glue or floral wire. For extra flair, add metallic or confetti-filled balloons.
SEO Tip: Adding unique elements like themed decorations can make your balloon arch stand out, increasing its appeal for event planners searching for creative ideas.
Tips for a Long-Lasting Balloon Arch
- Use High-Quality Balloons: Opt for durable latex balloons to prevent popping.
- Avoid Direct Sunlight: Heat can cause balloons to pop or deflate faster.
- Seal Balloons: Apply a balloon shine spray to maintain their appearance.
- Plan Ahead: Assemble the arch a day before the event to save time.
Common Mistakes to Avoid
- Over Inflating Balloons: This leads to popping and an uneven look.
- Skipping the Frame or Strip: A proper structure ensures stability.
Ignoring Proportions: Too few balloons can make the arch look sparse.

Pingback: orlistat weight loss
Pingback: avanafil online
Pingback: xenical 120mg amazon
Pingback: cialis dosage for 70 year old
Pingback: imodium walmart aisle
Pingback: silodosin and dutasteride
Pingback: semaglutid tabletten novo nordisk
Pingback: doxycycline kennel cough dosage
Pingback: doxycycline hyclate when pregnant
Pingback: doxycycline 100mg for acne reddit
Pingback: amsafast orlistat capsulas
Pingback: ketoconazole mechanism for SD
Pingback: vardenafil food recommendations
Pingback: orlistat food interaction overview
Pingback: amoxicillin basic overview
Pingback: pneumonia red flags
Pingback: tadalafil AB rating
Pingback: this guide to tadalafil for ED